Journal Report
This page enables administrators to create journal reports to their own design. A journal report differs from a summary report in that it focuses on listing lines that match the enquiry
being made. (A summary report by contrast tends to total and summarise data.) A typical Journal Report would be to show all leave from last month, or all sickness, or all shifts of a given type.
Reports can be designed and run instantly, or may be saved for re-running.
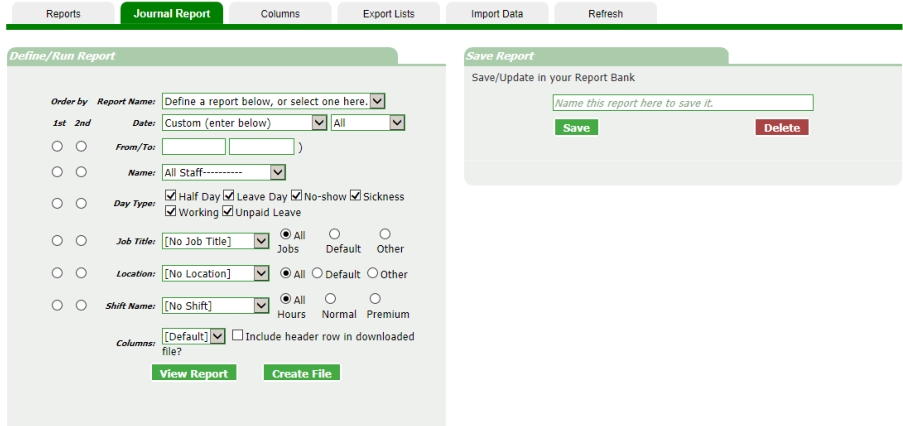
Run a simple report
At first the report designer might seem a little complex, but there's actually very little you need to do to get a report.
- Enter a date. Either fill in the from and to boxes directly (via calendar pickers), or choose from the common dates available in the date dropdown. (i.e. last month, this week, year-to-date and many
others). Notice the box that says all. Here you can select a given day of the week, i.e. only Sundays.
Everything else is optional, although some of these will probably be selected.
- Name - Either all staff or a person's name can be selected from the dropdown.
- Day Type - Check the boxes of those you want to include in the report. For example if running a sickness report, you'll want to untick the other boxes.
- Job Type - All (not filtered), default (where this corresponds to the staff's default job), Other (refering to the job of the shift worked.)
- Location - as per job type.
- Shift Name - Useful if you wish to know who has worked a specific shift.
- Columns - A default layout will provide a selection of columns, however you can select any other column designs you have created.
- Order by - you can choose the order of the listing. For example to show in date order or by name. A primary order and secondary can be chosen.
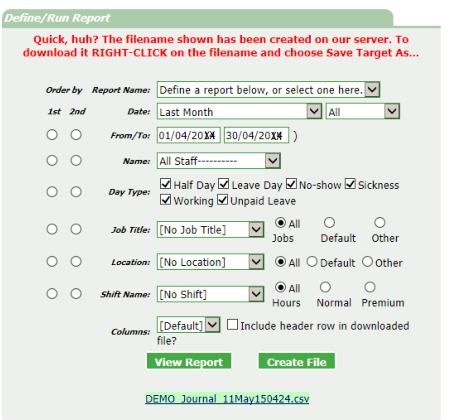
Viewing or creating a file.
- Viewing a report will show it instantly in a popup window, where print options await.
- Create File. In this instance the report is created on the server (with or without the column headings as per the check box.)
- In the example below, the Create File button was pressed. The green highlighted link will provide your file. Browsers behave differently here, some may open the file directly although it's recommended
that you use your browser's save option.
Saving a report design
If you or your colleagues are likely to use this report again, you can save it so that it can quickly be run next time. If you choose a standard date from the selection this will remain relative to
the current date. This means that a report to show 'last month's sickness' will always make last month relative to the current date.
- To save, simply give the report a name and click Save.
- From that point, the report will be listed in the Report Name dropdown. Selecting it will populate the options with the details of that report.